Micro welding equipment can increase quality and yield with process control
By Mr. Richard Barber, Engineering Manager, Amada Miyachi UK
Whether manufacturing sensors for use in high-value, low-volume handmade devices or for highly cost-sensitive mass-produced items, manufacturers are experiencing more pressure to deliver higher quality than in the past. Performance and operational expectations delivered in aerospace and medical manufacturing are becoming increasingly commonplace, even in general industry applications. In response, sensor design and production engineers must re-evaluate current methods, and seek to integrate assembly best practices. Indeed, as manufacturers look for a competitive advantage, sensor quality and robustness gained from the assembly process is now as much a key selling point as device functionality. For many manufacturers, taking advantage of modern micro welding techniques can offer a range of benefits to sensor assembly – including tight process control.
Sensor manufacturing technologies
Of course, micro welding is not the only technology available for sensor manufacturing. Solder remains a popular option, but the downsides are many. Determining long-term joint integrity presents one major challenge when using solder, as does process monitoring. Furthermore, the method entails relatively high temperature stresses at and around joints. The presence of fumes as well as limitations on process speed also make the technology less than ideal.
Of micro welding technologies, micro resistance welding is the more common method. Micro resistance weldinghas been used for years for making joints and consolidating flexible stranded wires into a solid block. Still, more recent quality demands and the desire for higher yield means manufacturers have to pay greater attention to process measurement when using this method. Capacitor Discharge and AC welders remain suitable for a number of applications, but some manufacturers with older weld heads and older CD or AC equipment are investing in newer technology – particularly when legacy gear fails to accommodate appropriate process measurement.
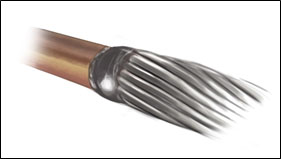
The pictured butt joint was produced with a PAW-200 with built in process monitoring.
Less prevalent, but equally effective, micro arc welding – whereby a contactless electric arc heats parts to cause amalgamation – is predominantly used in sensor assembly to bind two components together. Common applications include termination of fine wires to component pins. With this method, a controlled arc is struck between the pin end and wire end to create a focused heating zone. In the same instant, the two parts are brought together, fusing and consolidating the part two ends as a butt joint. It is particularly useful when joining stranded wires axially onto sensor pin devices, producing extremely high integrity joints with little or no prior wire preparation. This welding method can be used for inductive sensors or mounting semiconductor package pins onto lead frames. Overall, micro arc welding bears two notable benefits compared to soldering: the process is usually very fast (less than half a second per weld) and high temperatures are localised at the joint.
Sensor Micro Welding Equipment Considerations
Micro welding allows effective joining of extremely small sensor parts, typically ranging from around 3mm down to around 10μm. General rules of thumb apply – typically, small wires and pins of less than 1 millimetre (mm) are resistance welded at levels below 1000A DC – but at this scale, it is not enough simply to define the weld heat and electrode configuration. Quality and yield depend on equipment that enables close control of the welding process and continuous monitoring. This is especially true for sensors used in medical or aerospace products, which generally have to meet higher weld verification standards. To achieve reliable consistent welding, manufacturers need the best possible level of control coupled with the best possible method of checking each weld process.
When micro welding below 1000A DC, the best equipment choice is usually a DC linear resistance welding power supply. This gives a pure DC current, usually from a few amps to 1000A, preferably in fine incremental 1-amp steps. For volume manufacturing, manufacturers should implement units with high duty cycle ratings that can keep up with speed demands.
Micro welding equipment for high-value process control
For the greatest value, manufacturers should opt for fully closed-loop-controlled units that measure and store the uncontrolled electrical signals that occur during the welding process. The resolution and speed of such measurements will determine the welding unit’s ability to adapt and react in real time to process changes. While most linear power supplies provide an ability to set upper and lower limits around the uncontrolled parameters, few provide a means to set up and record a process analysis window for such parameters. Process window limiting can detect potential problems to a much more precise degree than basic limit checks, making it an essential functionality for competitive sensor manufacturers.
For example, one manufacturer utilised the window analysis feature of the DC1013-T Linear DC Resistance Welding Power Supply from Amada Miyachi Europe to determine the appropriate weld head pressure for an application. Weld head pressure and dynamic performance are key criteria for fine component welding. Quite often, welding processes start to deviate from the norm and begin to fail as a result of worn-out weld heads. It is crucial that the weld head ensures the welding electrodes remain in good contact throughout the weld process. Worn-out bearings and sticky mechanisms can creep up on the unsuspecting production engineer. Process window analysis allows operators to fully document the process and note correct pressures so they can easily return to a working process.
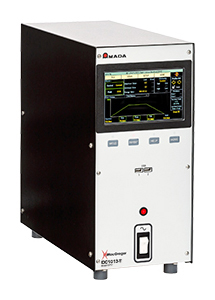
The automation-ready DC1013-T Linear DC Resistance Welding Power Supply from Amada Miyachi Europe incorporates SPC data collection and reporting capabilities via ethernet.
Statistical process control for sensor micro welding
Using equipment able to achieve a very high degree of accuracy, repeatability and process control is a prerequisite for sensor manufacturers today. However, more and more manufacturers that use micro welding as an assembly process are also implementing mass production statistical techniques as a means of continuous process improvement.
Most processes tend to follow mathematically defined curves. Statistical process control (SPC) and analysis of welding data compare field process data to these standard curves to predict, with a high degree of accuracy, outcomes such as likely reject rates. In the past, this data collection and analysis process was extremely tedious, but now welding unit manufacturers such as Amada Miyachi Europe provide SPC software analysis packages.
Built-in weld SPC functionality is a great tool for production and process welding engineers to easily record and analyse their welding cell information. With SPC, skilled operators can monitor their own work and determine when corrective action is needed, well in advance of serious yield or quality production problems. For example, electrode or product materials are changed, either accidentally or deliberately: with a welding process tied closely to real-time local SPC monitoring, operators can more readily detect, assess, and compensate for the effect of such changes.
Micro welding process control for high-quality high-yield sensor manufacturing
Ultimately, quality sensor assembly, whether for mass market or custom devices, depends in large part on process control, which is best served by sensitive and measurable micro welding equipment. As sensor design and production engineers move away from solder and welding techniques that offer little useful data, the welding experts at Amada Miyachi Europe offer a valuable resource. Of course, the right equipment must be effectively integrated into an engineering culture that embraces the newly available data in order to benefit an organisation in a meaningful way. Engineers should check equipment regularly to ensure wear does not impact weld quality, make process changes that data support, and remain aware of the cutting-edge in micro welding and micro weld monitoring for sensors.


